-
320x100

Abstract vector created by fullvector - www.freepik.com 이 글은 NomadCoders의 <React JS 마스터클래스>와 <벨로퍼트와 함께하는 모던 리액트 강의 노트>의 내용 일부를 정리한 글입니다.
🙇🏻♀️ 멋진 강의 감사합니다 🙇🏻♀️
개인 스터디 글로, 맞지 않는 내용이나 더 나은 방법을 공유해 주신다면 복받으실 거예요 👼✨
1) 시작하기
2) 기능 연습 & 3) 앱 만들기
4) styled-components ☀︎
5) 𝒘𝒊𝒕𝒉 타입스크립트
4-1. 스타일드 컴포넌트?
Styled Components는 컴포넌트 단위로 스타일링하기 때문에 개별 케이스로 분리해 CSS를 작성할 수 있어요.
이렇게 분리하지 않고 스크립트 내 작성하는 방식을 CSS-in-JS 라고 합니다.
CSS-in-JS 방식을 사용하는 라이브러리에는 Styled Components, emotion, styled-jsx, JSS 등이 있습니다.
여기서는 스타일드 컴포넌트를 다루는 법을 배워봅니다!
스타일드 컴포넌트의 장점은 아래와 같습니다.
- 페이지에서 렌더링되는 요소에 맞춰 자동으로 해당 스타일만 삽입합니다. 그때그때 필요한 스타일만 로드한다는 거죠!
- 스타일에 대한 고유 클래스명을 생성합니다. 중복이나 오타 걱정 노놉
- 더이상 사용되지 않는 CSS를 쉽게 삭제할 수 있습니다. 모든 스타일은 특정 요소와 연결되어 있기 때문에 해당 요소가 삭제되면 스타일도 삭제돼요.
- 동적 스타일링이 편해집니다. 이 props가 있다면 A, 없다면 B와 같이 직관적으로 개별 스타일링이 가능해요.
자세한 문서 내용은 여기를 참고하세요 👇👇
https://styled-components.com/docs
styled-components: Documentation
Learn how to use styled-components and to style your apps without stress
styled-components.com
4-2. 시작하기!
4-2-1. 설치
시작하려면 아묻따 뭐다? 패키지 설치!
$ npm i styled-components그리고 이걸 styled라는 이름으로 가져와서 씁니다.
import styled from 'styled-components';만만한 건 역시 버튼이니까 버튼 컴포넌트를 하나 만들어 보죠!
const Button = styled.button``;유의할 점 세가지!
1. 컴포넌트 이름은 대문자로 시작
2. styled 뒤에 사용해야 할 HTML 태그명 입력
3. 백틱(``)으로 감싸서 스타일시트 작성import styled from 'styled-components'; const Button = styled.button` display: block; padding: 6px 10px; color: #fff; font-size: 18px; border-radius: 3px; background-color: crimson; border: 0; `; function App() { return ( <div> <Button>나는 버튼!</Button> </div> ); } export default App;TIP. styled-components 내에서 emmet을 쓰고 싶다면 vscode-styled-components 을 설치합니다.

컴포넌트 단위이기 때문에 컴포넌트 내에 컴포넌트를 넣을 수도 있고,
sass의 중첩 문법이나 부모 선택 참조자
&를 사용할 수도 있어요!뿐만 아니라 다른 컴포넌트를
${}로 데려와 하위에 작성할 수도 있고요.import styled from 'styled-components'; const Title = styled.div` color: darkolivegreen; h1 { font-size: 30px; margin: 0 0 10px 0; } `; const Notice = styled.div` padding: 20px; border: 2px solid #aaa; ${Title}:hover { color: crimson; } `; const Button = styled.button` display: block; padding: 6px 10px; color: #fff; font-size: 18px; border-radius: 3px; background-color: crimson; border: 0; &:hover { background-color: teal; } `; function App() { return ( <div> <Notice> <Title> <h1>아아 공지를 읽으세요 📢</h1> <h2>작성자: nykim</h2> </Title> <Button>확인</Button> </Notice> </div> ); } export default App;4-2-2. 확장하기
한편, 컴포넌트를 확장해서 쓸 수도 있어요.
Sass의 @mixin은 공통 속성을 정의하고 인자로 스타일을 살짝 다르게 설정해 줄 수 있었는데,
이와 유사하게 스타일드 컴포넌트에서도 props로 이래라저래라 해줄 수 있습니다.
import styled from 'styled-components';

const Button = styled.button`
  background-color: ${(porps) => porps.bgColor || 'lightgray' };
  display: block;
  // ...
`;

function App() {
  return (
    <div>
      <Button bgColor="skyblue">확인</Button>
      <Button bgColor="salmon">취소</Button>
    </div>
  );
}

export default App;
그럼 props로 bgColor가 있을 경우 그 값이 적용되고, 아니라면 ‘lightgray’ 값이 적용 되겠죠.
이렇게 하면 우리는 컴포넌트내 클래스를 전혀 달지 않았음에도 불구하고, 리액트에서 알아서 클래스네임을 각각 적용해줍니다.

만약 여러 줄의 코드를 조건부로 설정하고 싶다면 { css } 를 별도로 가져와 써야 합니다.
import styled, { css } from 'styled-components';

const Button = styled.button`
  // ...
	${(props) =>
    props.special &&
	  css`
	    background-color: red;
	    font-size: 32px;
	  `};
`;

function App() {
  return (
    <div>
      <Button bgColor="skyblue" special>확인</Button>
      <Button bgColor="salmon">취소</Button>
    </div>
  );
}

export default App;
그럼 Sass의 @extend 처럼 쓸 수도 있지 않을까요? 한번 해봅시다!
새로운 컴포넌트를 만들 때, 거기에 쓰일 기본 속성들을 다른 스타일드 컴포넌트로부터 확장해서 쓰는 거죠.
사용법은 간단합니다. styled 뒤에 점 대신 괄호()로 기본형이 될 컴포넌트를 넣습니다.
import styled from 'styled-components';

const Button = styled.button`
	//...
`;

const FullButton = styled(Button)`
  width: 100%;
  border-radius: 4px;
`;

function App() {
  return (
    <div>
      <FullButton bgColor="skyblue">확인</FullButton>
      <Button bgColor="salmon">취소</Button>
    </div>
  );
}

export default App;
그럼 props를 받아와 처리하는 것도 동일하기 때문에 bgColor 를 그대로 사용할 수 있어요.

또 이렇게 사용할 수도 있습니다. 스타일은 그대로 유지하되, 마크업만 바꿔치는 거죠!
예를 들면 button 의 스타일을 유지한 채 <button> 태그가 아닌 <a> 태그로 쓰는 것이 가능합니다.
as 라는 속성만 덧붙여 줍니다.
function App() {
  return (
    <div>
	  <FullButton bgColor="skyblue">확인</FullButton>
      <Button bgColor="salmon">취소</Button>
      <Button as="a">더보기</Button>
    </div>
  );
}
4-2-3. 애니메이션 사용하기
스타일드 컴포넌트 내 애니메이션을 적용하려면 keyframes를 가져와야 합니다.
import styled, { keyframes } from "styled-components";그런 다음
keyframes``;으로 애니메이션을 작성하고,${}으로 가져와서 사용합니다.const animation = keyframes` 50% { transform: scale(1.3); } `; const FullButton = styled(Button)` width: 100%; border-radius: 4px; animation: ${animation} 1s infinite; `;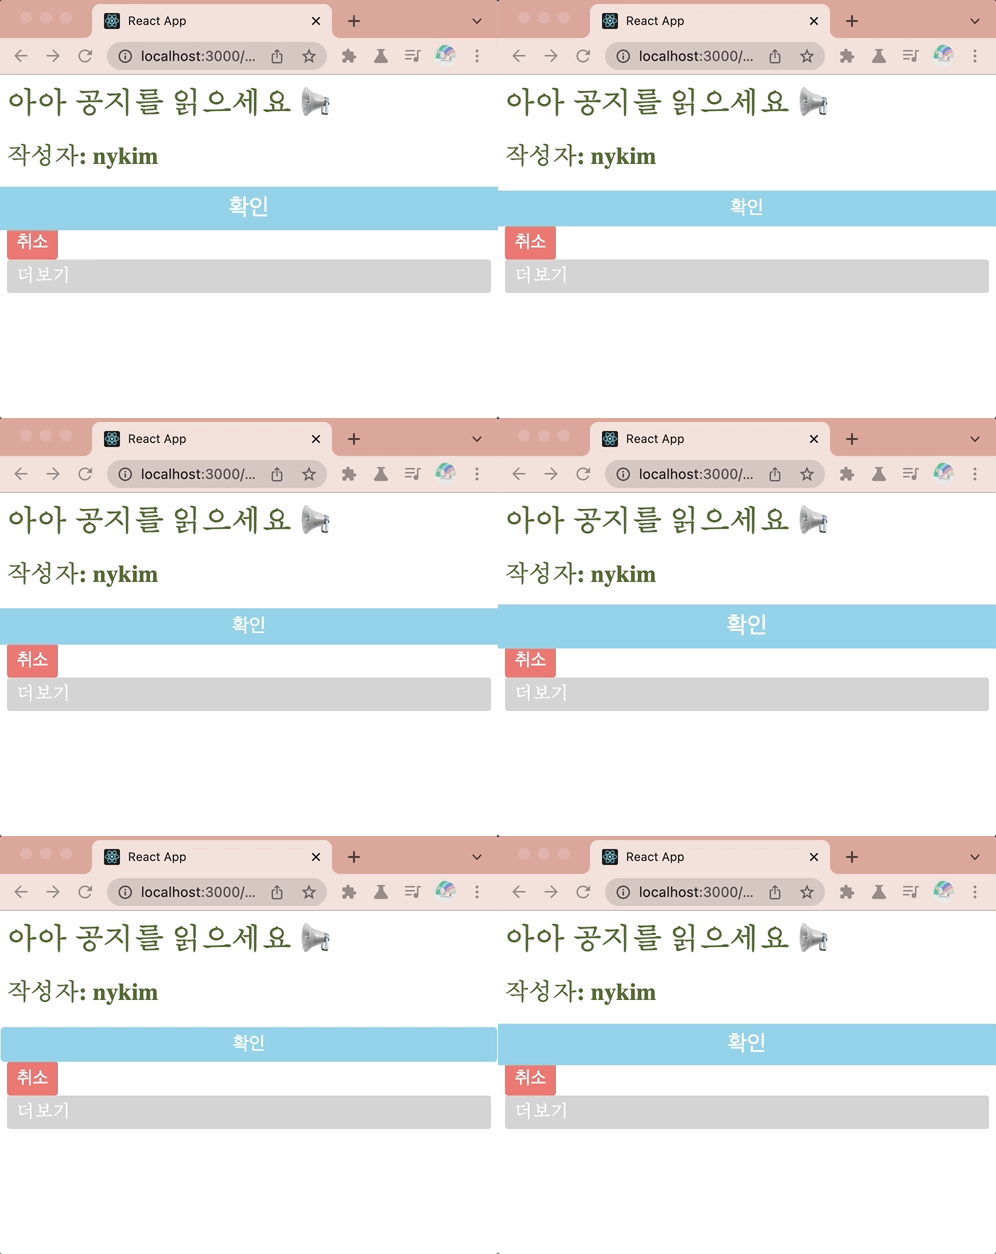
4-3. 템플릿 리터럴(Template literals)
근데 궁금한 점 하나! 🙋♀️
도대체 이
``(backtick) 이 뭐길래, 요 안에 스타일을 넣으면 뿅하고 적용되는 걸까요?이번에는 이 ‘템플릿 리터럴’에 대해 알아봅니다.
템플릿 리터럴은 ‘내장된 표현식을 허용하는 문자열 리터럴’ 입니다..... 예? 「(゚ペ)
“리터털 = 소스 코드의 값을 표기한 것”이므로, 리터럴은 그냥 변치 않을 데이터 자체를 가리킨다고 생각하면 됩니다.
let a = 1; // 1은 정수 리터럴
let b = 'nana'; // 'nana'는 문자열 리터럴
아하 그러니까 얘도 문자열 리터럴인데 ``을 써서,
`Hello, ${name}`처럼 내장되어 있는 이런저런 표현을 써먹을 수 있다는 거군요!이런 템플릿 리터럴은 런타임 시점에 일반 자바스크립트 문자열로 바뀌게 됩니다.
그래서 이 템플릿 리터럴이 지원하는 표현식에는 뭐가 있냐면요... (참고: MDN)
1) Multi-line 지원
console.log(`아아아아 나는 첫 번째 줄
그리고 나는 두 번째 줄이지`);
2) 표현식 삽입(Expression interpolation) 가능
let a = 0;
let b = 100;
console.log(`a하고 b를 더하면 ${a+b}(이)가 된다.`);
3) 중첩 가능
const tired = true;
const taste = '아메리카노';
const chocie = `나는 출근길에
${ tired ? `${ taste || '카푸치노'}` : '우유'} 를 샀다.`;

console.log(chocie);
4) Tagged templates
이게 아까 스타일드 컴포넌트에서 본 형태입니다. ``으로 감싼 내용을 함수에 넣어 주는 거죠.
const tag = (str) => alert(str);
tag`Hello`;

// styled.button``; 과 비슷하죠!
이렇게
함수``형태로 쓸 경우 첫 번째 인수는 표현식을 기준으로 분할된 문자열의 배열이, 나머지 인수는 표현식으로 전달된 값이 됩니다.let name = '붕어빵'; let value = 5000; const tag = (a, ...b) => { console.log(a); console.log(b); } tag`${name}을 ${value}원어치 샀다.`;
오호 그럼 ${}로 넘어온 녀석들에게, reduce 구문을 사용해 볼 수 있겠네요!
const props = {
	name: '붕어빵',
	value: 5000
}

const tag = (a, ...b) => {
  return a.reduce((result, text, i) => `${result}${text}${b[i] ? b[i](props) : ''}`, '');
}

tag`
	구매한 것: ${props => props.name};
	가격: ${props => props.value};
`;

/*
	구매한 것: 붕어빵;
  가격: 5000;
*/
그러면 스타일드 컴포넌트는 이런 식으로 넘어온 값을 설정했던 거구나, 하고 짐작해 볼 수 있겠네요.
styled.button`
	color: ${props => props.color};
	background-color: ${props => props.bgColor};
`;
4-5. Theme 적용하기
{ ThemeProvider } 를 활용해 스타일에 ‘테마’를 적용해 봅시다.
무슨 테마를 쓸 것인가는 테마를 적용할 컴포넌트의 상위(index.js)에서 지정해 주면 됩니다.
/* index.js */

import React from 'react';
import ReactDOM from 'react-dom';
import { ThemeProvider } from 'styled-components';
import App from './App';

const darkTheme = {
  textColor: 'whitesmoke',
  backgroundColor: '#111'
};

const lightTheme = {
  textColor: '#111',
  backgroundColor: 'whitesmoke'
};

ReactDOM.render(
  <React.StrictMode>
    <ThemeProvider Theme={darkTheme}>
      <App />
    </ThemeProvider>
  </React.StrictMode>,
  document.getElementById('root')
);
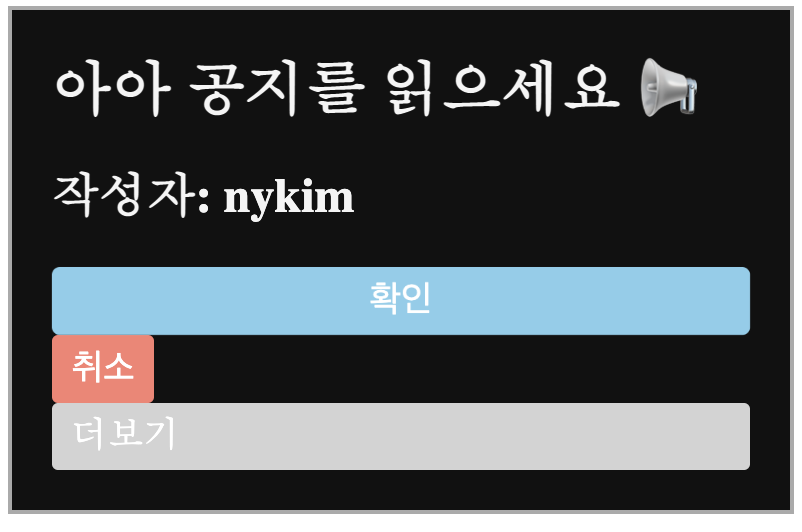
App이 ThemeProvider 아래에 있기 때문에 darkTheme 또는 whiteTheme의 속성에 접근할 수 있습니다.
이미 Theme={darkTheme}를 적용해놨기 때문에, backgroundColor 는 #111 값이 됩니다.
const Title = styled.div`
  color: ${(props) => props.theme.textColor};
`;

const Notice = styled.div`
  background-color: ${(props) => props.theme.backgroundColor};
`;
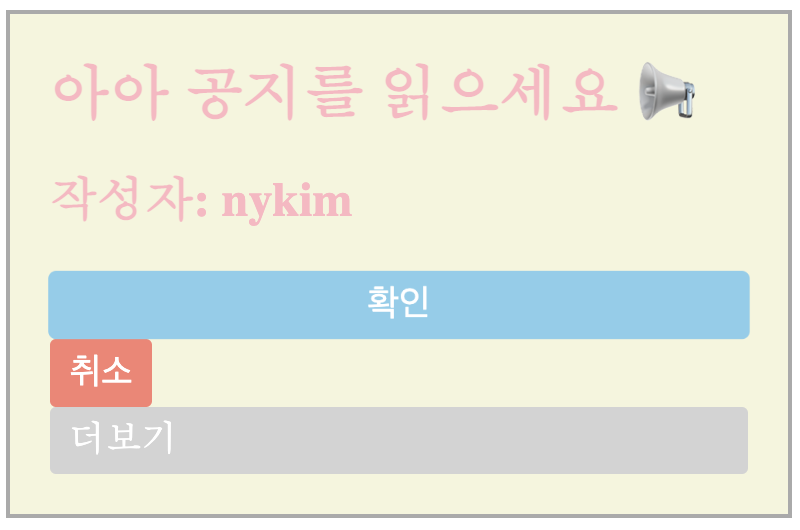
만약 새롭게 pastelTheme를 추가하고 싶다면, 동일하게 객체를 만들어주고 Theme={} 부분을 바꿔주면 되겠죠!
const pastelTheme = {
  textColor: 'lightpink',
  backgroundColor: 'beige'
};

ReactDOM.render(
  <React.StrictMode>
    <ThemeProvider theme={pastelTheme}>
      <App />
    </ThemeProvider>
  </React.StrictMode>,
  document.getElementById('root')
);
4-6. 응용하기
4-6-1. 공통 CSS 적용하기
CSS 초기화 또는 통일화를 위해 reset.css나 normalize.css를 쓰곤 하는데 스타일드 컴포넌트에서도 관련 패키지를 제공하고 있습니다.
- reset.css ⇒ styled-reset
- normalize.css ⇒ styled-normalize
한편 전역으로 적용되는 CSS(common.css 등)가 필요하다면 스타일드 컴포넌트에서 제공하는 { createGlobalStyle } 을 사용합니다.
reset이나 normalize를 불러오고 ${} 를 이용해 쓱 넣어줄 수도 있겠죠.
/* GlobalStyle.js */

import { createGlobalStyle } from 'styled-components';
import Normalize from 'styled-normalize';

const GlobalStyle = createGlobalStyle`
  ${Normalize};

  * {
    margin: 0;
    padding: 0;
  }

  body {
    background-color: #f0f0f0;
  }
`;

export default GlobalStyle;
전역으로 적용될 스타일을 작성하고 export 한 다음, 상위 컴포넌트에 위치시킵니다.
/* index.js */

import React from 'react';
import ReactDOM from 'react-dom';
import { ThemeProvider } from 'styled-components';
import GlobalStyle from './GlobalStyle';
import App from './App';

const darkTheme = {
  textColor: 'whitesmoke',
  backgroundColor: '#111'
};

const lightTheme = {
  textColor: '#111',
  backgroundColor: 'whitesmoke'
};

const pastelTheme = {
  textColor: 'lightpink',
  backgroundColor: 'beige'
};

ReactDOM.render(
  <React.StrictMode>
    <GlobalStyle />
    <ThemeProvider theme={pastelTheme}>
      <App />
    </ThemeProvider>
  </React.StrictMode>,
  document.getElementById('root')
);
4-6-2. 유틸 함수 사용
이번엔 polished 를 설치해 CSS를 좀 더 다채롭게 써보죠!
clearFix(), hideText(), darken(), lighten() 같이 편리하게 써먹을 수 있는 함수들을 제공해요.
또, polished 내에도 normalize.css 를 제공하고 있어 이쪽에서 가져와서 써도 됩니다.
/* GlobalStyle.js */

import { createGlobalStyle } from 'styled-components';
import { normalize } from 'polished';

const GlobalStyle = createGlobalStyle`
  ${normalize()};

  * {
    margin: 0;
    padding: 0;
  }

  body {
    background-color: #f0f0f0;
  }
`;

export default GlobalStyle;
관리하기가 복잡하므로 components/ 폴더 아래 컴포넌트를 두고, 이걸 import 해서 써보죠!
여러 은행사 중 하나를 선택할 수 있는 목록을 보여준다고 해봅니다.
/* components/Bank.js */

import React from 'react';
import styled, { css } from 'styled-components';

const BankButton = styled.button``;

function Bank() {
  return <BankButton></BankButton>;
}

export default Bank;
/* App.js */ import Bank from './components/Bank'; function App() { return ( <div> <Bank name="wr" event> 우리은행 <br/><span>할인 이벤트(~12/31)</span> </Bank> <Bank name="kb">국민은행</Bank> <Bank name="hn">하나은행</Bank> </div> ); } export default App;이때, <Bank></Bank> 사이에 들어있는 값(우리은행, 국민은행...)을 가져오기 위해 자식 컴포넌트에서
props.children을 조회합니다. 이건 JSX 태그 사이에 있는 것들을 리턴해 줘요!/* components/Bank.js */ import React from 'react'; import styled, { css } from 'styled-components'; const BankButton = styled.button``; function Bank({children}) { return <BankButton>{children}</BankButton>; } export default Bank;부모(App)에서 내려준 props도 가져올 건데, 추후에 disabled 등의 props가 추가될 수도 있으므로
...rest형태로 가져옵니다./* components/Bank.js */ import React from 'react'; import styled, { css } from 'styled-components'; const BankButton = styled.button``; function Bank({children, ...rest}) { return <BankButton {...rest}>{children}</BankButton>; } export default Bank;이제 스타일링을 해줍시다. bankColors 내의 컬러값을 props.name으로 선택해 가져오고, hover나 disabled 시의 모습도 설정합니다. 이때 darken() 등의 함수를 써볼 수 있겠네요.
import React from 'react';
import styled, { css } from 'styled-components';
import { darken } from 'polished';

const bankColors = {
  wr: '#2172b2',
  kb: '#fdb810',
  hn: '#0d905d'
};

const BankButton = styled.button`
  display: flex;
  flex-direction: column;
  align-items: center;
  justify-content: center;
  height: 8rem;
  padding: 1rem;
  color: #fff;
  font-size: 1.6rem;
  font-weight: 700;
  border: 0;
  border-radius: 0.4rem;
  ${(props) => {
    const color = bankColors[props.name];
    return css`
      background-color: ${color};

      &:hover {
        cursor: pointer;
        background-color: ${darken(0.05, color)};
      }

      &:disabled {
        color: #999;
        background-color: #c0c0c0;
        cursor: not-allowed;
      }
    `;
  }}

  span {
    display: inline-block;
    margin: 0.4rem 0 0;
    font-size: 80%;
    font-weight: 300;
  }
`;

function Bank({ children, ...rest }) {
  return <BankButton {...rest}>{children}</BankButton>;
}

export default Bank;
한편, bankColors와 일치하지 않는 props.name이 들어올 경우 에러가 발생하므로 디폴트 설정도 해줍시다.
import React from 'react';
import styled, { css } from 'styled-components';
import { darken } from 'polished';

const bankColors = {
  wr: '#2172b2',
  kb: '#fdb810',
  hn: '#0d905d',
  default: '#222222'
};

const BankButton = styled.button`
  //...

  ${(props) => {
    const color = bankColors[props.name] || bankColors['default'];
    return css`
      //....
    `;
  }}

  //...
`;

function Bank({ children, ...rest }) {
  return <BankButton {...rest}>{children}</BankButton>;
}

export default Bank;
Grid CSS를 활용해 보기 좋게 App.js를 다듬고, 유지보수성 테스트를 위해 은행 몇 가지를 추가해봤습니다.
/* App.js */

import Bank from './components/Bank';
import styled from 'styled-components';

const AppBlock = styled.div`
  display: grid;
  grid-template-columns: 1fr 1fr 1fr;
  width: 100%;
  min-width: 32rem;
  max-width: 48rem;
  margin: 4rem auto;
  column-gap: 1.4rem;
  row-gap: 1.4rem;
`;

function App() {
  return (
    <AppBlock>
      <Bank name="wr" event>
        우리은행
        <br />
        <span>할인 이벤트(~12/31)</span>
      </Bank>
      <Bank name="kb">국민은행</Bank>
      <Bank name="hn">하나은행</Bank>
      <Bank name="sh" disabled>
        신한은행
      </Bank>
      <Bank name="ibk">기업은행</Bank>
      <Bank name="nn">나나은행</Bank>
    </AppBlock>
  );
}

export default App;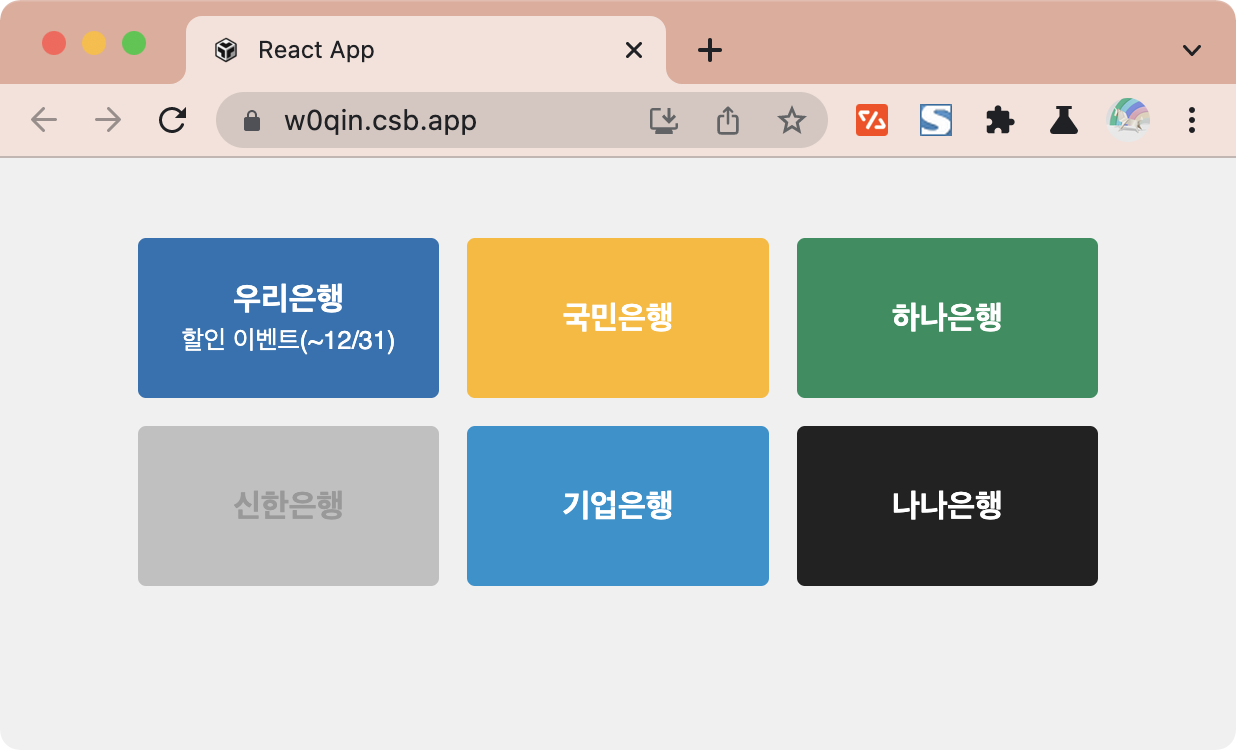
이번에는 event 라는 props가 있을 때 특별한 스타일링을 해보죠!
얘는 줄 하나를 전체 차지하면서 그림자가 생기는 애니메이션을 주려고 합니다.우선 애니메이션을 위해 keyframes 를 쓱 가져옵니다.
import styled, { css, keyframes } from 'styled-components';애니메이션 내에서도 bankColors 내 값 중 하나를 받아와 box-shadow로 쓸 예정이기 때문에, 인자를 통해 받아올 수 있도록 함수를 사용합니다.
const animation = (color) => keyframes`
	0% {
		box-shadow: 0 0 0 ${color}
  }
`;
그리고 props.event일 때 적용될 eventStyle을 만들어 줍니다.
const eventStyle = () => {
  if (props.event) {
    return css`
      grid-column: 1 / 4;
      order: -1;
      animation: ${onEventAnimation(color)} 3s infinite;
    `;
  }
};
이때 단순 템플릿 리터럴로 리턴
return ``;하는 경우 오류가 뙇 발생하므로css``;형태로 리턴해 줍니다.
앗 넵 이제
${ (props) => { return css `` } }내에${eventStyle}을 넣어주면 완료!/* Bank.js */ import React from 'react'; import styled, { css, keyframes } from 'styled-components'; import { darken, lighten } from 'polished'; const bankColors = { wr: '#2172b2', kb: '#fdb810', hn: '#0d905d', ibk: '#0892ce', default: '#222222' }; const onEventAnimation = (color) => keyframes` 30%, 70% { box-shadow: 0rem 0.2rem 1.2rem -0.1rem ${lighten(0.05, color)}; } `; const BankButton = styled.button` display: flex; flex-direction: column; align-items: center; justify-content: center; height: 8rem; padding: 1rem; color: #fff; font-size: 1.6rem; font-weight: 700; border: 0; border-radius: 0.4rem; ${(props) => { const color = bankColors[props.name] || bankColors['default']; const eventStyle = () => { if (props.event) { return css` grid-column: 1 / 4; order: -1; animation: ${onEventAnimation(color)} 3s infinite; `; } }; return css` background-color: ${color}; &:hover { cursor: pointer; background-color: ${darken(0.05, color)}; } &:disabled { color: #999; background-color: #c0c0c0; cursor: not-allowed; } ${eventStyle}; `; }} span { display: inline-block; margin: 0.4rem 0 0; font-size: 80%; font-weight: normal; } `; function Bank({ children, ...rest }) { return <BankButton {...rest}>{children}</BankButton>; } export default Bank;/* App.js */ import Bank from './components/Bank'; import styled from 'styled-components'; const AppBlock = styled.div` display: grid; grid-template-columns: 1fr 1fr 1fr; width: 100%; min-width: 32rem; max-width: 48rem; margin: 4rem auto; column-gap: 1.4rem; row-gap: 1.4rem; `; function App() { return ( <AppBlock> <Bank name="wr">우리은행</Bank> <Bank name="kb">국민은행</Bank> <Bank name="hn" event> 하나은행<br /><span>추첨 이벤트 (~1/28)</span> </Bank> <Bank name="sh" disabled>신한은행</Bank> <Bank name="ibk">기업은행</Bank> <Bank name="nh">농협은행</Bank> <Bank name="nn" event> 나나은행<br /><span>할인 이벤트 (~12/31)</span> </Bank> </AppBlock> ); } export default App;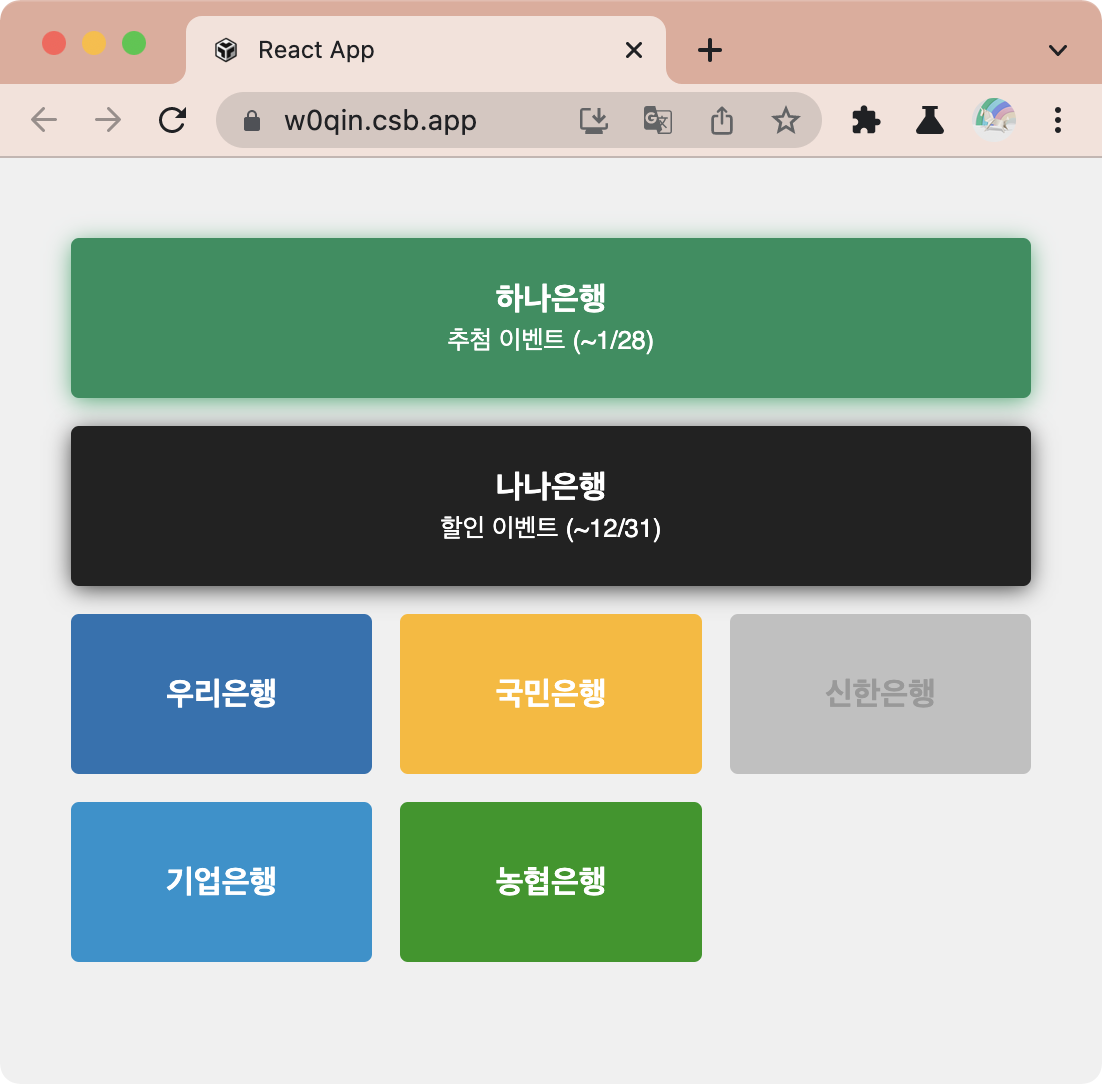
4-6-3. 레이어 팝업 만들기
이번에는 레이어 팝업을 구현해 봅니다!
LayerPopup 컴포넌트를 일단 슥 만들어줍니다.
import React from 'react';
import styled from 'styled-components';

function LayerPopup() {
  return (
    <Popup>
      <PopupContents>
	      <strong>타이틀</strong>
	      <p>내용</p>
	      <div className="buttonGroup">
	        <button>확인</button>
	        <button>취소</button>
	      </div>
				<PopupCloseBtn>팝업 닫기</PopupCloseBtn>
      </PopupContents>
			<Dim/>
    </Popup>
  );
}

export default LayerPopup;
타이틀, 내용, 버튼은 유동적인 부분이므로 props가 될 수 있도록 바꿔줍니다.
여기에 defaultProps도 넣어주면 좋겠네요!
import React from 'react';
import styled from 'styled-components';

function LayerPopup({ title, children, cancelButton, confirmButton }) {
  return (
    <Popup>
      <PopupContents>
        <strong>{title}</strong>
        <p>{children}</p>
        <div className="buttonGroup">
          <button>{cancelButton}</button>
          <button>{confirmButton}</button>
        </div>
				<PopupCloseBtn>팝업 닫기</PopupCloseBtn>
      </PopupContents>
			<Dim/>
    </Popup>
  );
}

LayerPopup.defaultProps = {
  title: '안녕하세요',
  children: 'Lorem Ipsum Dolor Sit Amet?',
  cancelButton: '취소',
  confirmButton: '확인'
};

export default LayerPopup;
이제 예쁘게 꾸며줄 시간입니다 🧑🎨
/* LayerPopup.js */

import React from 'react';
import styled from 'styled-components';
import Button from './Button';
import { hideVisually } from 'polished';
import Close from './../assets/close';

const Popup = styled.div`
  position: fixed;
  top: 0;
  left: 0;
  width: 100%;
  height: 100%;
  display: flex;
  align-items: center;
  justify-content: center;
`;

const Dim = styled.div`
  position: absolute;
  top: 0;
  left: 0;
  width: 100%;
  height: 100%;
  background-color: rgba(0, 0, 0, 0.7);
`;

const PopupContents = styled.div`
  position: relative;
  width: 30rem;
  background-color: #fff;
  padding: 3.6rem;
  border-radius: 0.3rem;

  strong {
    display: block;
    font-size: 3rem;
    margin-bottom: 1.6rem;
  }

  p {
    line-height: 160%;
    font-size: 1.6rem;
  }

  .buttonGroup {
    display: flex;
    justify-content: space-between;
    margin-top: 3rem;
  }
`;

const PopupCloseBtn = styled.button`
  position: absolute;
  top: 2.4rem;
  right: 2.4rem;
  width: 1.8rem;
  height: 1.8rem;
  border: 0;

  span {
    ${hideVisually()};
  }

  path {
    stroke: #666;
  }

  &:hover path {
    stroke: #000;
  }
`;

function LayerPopup({ title, children, cancelButton, confirmButton }) {
  return (
    <Popup>
      <PopupContents>
        <strong>{title}</strong>
        <p>{children}</p>
        <div className="buttonGroup">
          <Button type="line">{cancelButton}</Button>
          <Button type="fill">{confirmButton}</Button>
        </div>
        <PopupCloseBtn>
          <span>팝업 닫기</span>
          <Close />
        </PopupCloseBtn>
      </PopupContents>
			<Dim/>
    </Popup>
  );
}

LayerPopup.defaultProps = {
  title: '안녕하세요',
  children: 'Lorem Ipsum Dolor Sit Amet?',
  cancelButton: '취소',
  confirmButton: '확인'
};

export default LayerPopup;
다음은 취소(닫기)와 확인 버튼을 눌렀을 때 이벤트를 만들어 줄 차례입니다.
<Button type="line" onClick={onCancel}/>처럼 각 버튼에게 이벤트를 달아줍니다.그리고 팝업의 표시 유무를 visible이란 props 로 관리합니다.
visible 이란 props가 있다면 보여지고, 없으면 보이지 않는 상태입니다.
/* LayerPopup.js */

function LayerPopup({ visible, onConfirm, onCancel, title, children, cancelButton, confirmButton }) {
  if (!visible) return null;
  return (
		<Popup>
    {/* ... */}
		</Popup>
  );
}
그럼 이걸 부모 컴포넌트에서 컨트롤 해야겠죠. App.js로 올라와 state로 설정합니다.
/* App.js */

import { useState } from 'react';

//...

function App() {
  const [popup, setPopup] = useState(false);
	const onClick = () => {
    setPopup(true);
  };
  const onConfirm = () => {
    console.log('확인');
    setPopup(false);
  };
  const onCancel = () => {
    console.log('취소');
    setPopup(false);
  };

  return (
    <>
      <AppBlock>
        {/* ... */}
      </AppBlock>
      <LayerPopup />
    </>
  );
}

export default App;
또, 기존에 있던 bank 들을 map()으로 뿌려지게끔 변경했습니다.
/* App.js */

//...

function App() {
  const bankList = [
    { eng: 'wr', ko: '우리' },
    { eng: 'kb', ko: '국민' },
    { eng: 'hn', ko: '하나', event: { name: '추첨', date: '1/31' } },
    { eng: 'sh', ko: '신한', disabled: true },
    { eng: 'ibk', ko: '기업', event: { name: '한정', date: '1/31' } },
    { eng: 'nh', ko: '농협' },
    { eng: 'na', ko: '나나' }
  ];

  const [popup, setPopup] = useState(false);
  const onClick = () => {
    console.log('onclick');
    setPopup(true);
  };
  const onConfirm = () => {
    console.log('확인');
    setPopup(false);
  };
  const onCancel = () => {
    console.log('취소');
    setPopup(false);
  };

  return (
    <>
      <AppBlock>
        {bankList.map((bank) => {
          return (
            <Bank
							id={bank.eng}
							key={bank.eng}
              name={bank.eng}
              disabled={bank.disabled}
              event={bank.event}
              onClick={onClick}
            >
              <span>{bank.ko}은행</span>
              {bank.event && (
                <i>
                  {bank.event.name} 이벤트 (~{bank.event.date})
                </i>
              )}
            </Bank>
          );
        })}
      </AppBlock>
      <LayerPopup visible={popup} onCancel={onCancel} onConfirm={onConfirm} />
    </>
  );
}

export default App;
한편, 심적 안정을 위한(?) 팝업 트랜지션 효과도 넣어줍니다.
팝업이 나타날 때 딤에게 fadeIn 애니메이션을, 팝업창에게 slideInUp 애니메이션을 주려고 합니다.
반대로 사라질 때는 딤에게 fadeOut 애니메이션, 팝업창에게 slideOutDown 애니메이션을 줍니다.
다만 문제가 하나 있는데요,
현재
visible로 팝업을 컨트롤하고 있어서 이 state에 맞춰 돔이 생기거나 파괴됩니다.따라서
!visible이 되는 즉시 돔이 사라지므로, 페이드아웃 애니메이션이 적용되기 전에 화면에서 없어져 버립니다.해결 방법으로는 돔을 그냥 그려놓은 채 CSS의 visible 속성과 opacity 속성 값을 변경해 트랜지션 효과를 주는 방법도 있습니다. (참고)
아니면
visible과 별개로 ‘화면상에 그려지고 있는가’만을 체크하는 state를 따로 두는 방법도 있어요. (참고)예를 들어,
userVisible이란 state를 만들어 두고,!visible(팝업닫힌 상태)면서userVisible(화면상에 아직 존재)이면 페이드아웃 효과를 주는 거죠.이렇게 페이드아웃 중이면
animate란 state를 TRUE로 두고, 애니메이션이 끝나면!animate와!userVisible로 만듭니다.그러면 돔이 사라지는 건
visible(유저가 클릭해서 팝업닫힌 상태)이 아니라!userVisible(페이드아웃 애니메이션이 끝난 상태)일 때가 됩니다. 또, 애니메이션 중일 때 팝업이 사라져버리면 안 되니까!animate일 때만 사라져야겠죠.까 visible과 반대인
!visible로 주면 됩니다.const Popup = styled.div` //... animation: ${fadeIn} 0.3s; //! 보여질 때 페이드인 애니메이션 animation-fill-mode: forwards; ${(props) => props.disappear && css` animation-name: ${fadeOut}; //! dissappear props를 받으면 페이드아웃 애니메이션 `} `; const PopupContents = styled.div` //... animation: ${slideInUp} 0.3s 50ms; //! 보여질 때 슬라이드인 애니메이션 animation-fill-mode: both; ${(props) => props.disappear && css` animation: ${slideOutDown} 0.3s; //! dissappear props를 받으면 슬라이드아웃 애니메이션 `} //... `; function LayerPopup({ visible, //... }) { const [animate, setAnimate] = useState(false); //! 애니메이션 중인지 판단 const [userVisible, setUserVisible] = useState(visible); //! 사용자에게 보여지는 상태인지 판단 useEffect(() => { if (userVisible && !visible) { //! 사용자에게는 아직 보여지고 있지만 팝업은 닫은 상태일 때 setAnimate(true); //! 애니메이션 활성화 } setUserVisible(visible); //! userVisible을 visible과 동일하게 }, [userVisible, visible]); if (!animate && !userVisible) return null; //! 애니메이션 상태도 아니고, 사용자에게 보이는 상태도 아닐 때만 그리지 않음 return ( <Popup disappear={!visible} onAnimationEnd={() => setAnimate(false)}> {/*! disappear값 넘기고, 애니메이션 종료 시 !animate로 설정 */} <PopupContents disappear={!visible}> {/*...*/} </PopupContents> <Dim onClick={onCancel} /> </Popup> ); }728x90'Blog > Library' 카테고리의 다른 글
Framer-motion 라이브러리 훑어보기 (9) 2022.09.08 [ReactJS] 5. 𝒘𝒊𝒕𝒉 타입스크립트 (225) 2022.02.13 [ReactJS] 2. 기능 연습 & 3. 앱 만들기 (0) 2022.02.03 [ReactJS] 1. 시작하기 (7) 2022.02.01 [Vue/Vuex] 뷰 실습 - Todo 웹앱 만들기 (4) (2) 2020.06.03 댓글
nana_log
좋아하는 걸 좋아하는 나나 🤟
